We saw how to set up the OrderCloud Headstart buyer and seller websites in the previous article. My buyer application’s main page is blank after I configured my Ordercloud Headstart application.
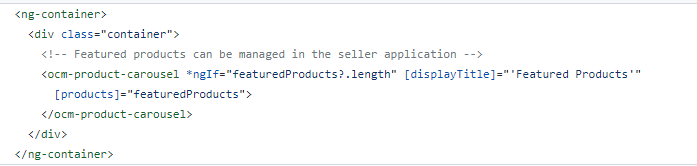
I examined the code and discovered that the feature products list must be presented on home page, and the logic is already there in the buyer application code. Here is where we may look at the code that has been implemented here.
In second screen shot you can check “xp.Featured” filter is responsible to get the featured products from Order cloud commerce. Featured is the extended property and it is not configured and found in Headstart Seller code. To enable this feature we have to configure or managed the Featured products in the seller application and this code is missing.
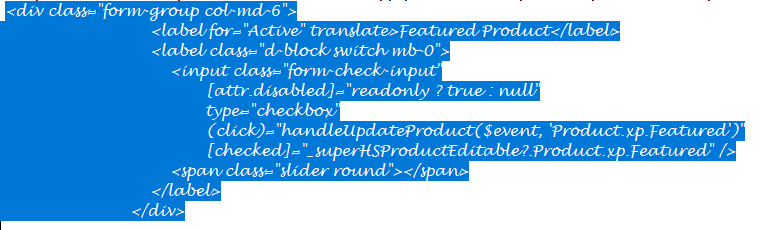
I have implemented the feature product configuration code in seller application. We have added the featured product checkbox field in Product creation section (please see below screen shot). Admin or seller can able to set the product as a featured product by selecting the Featured checkbox flag.
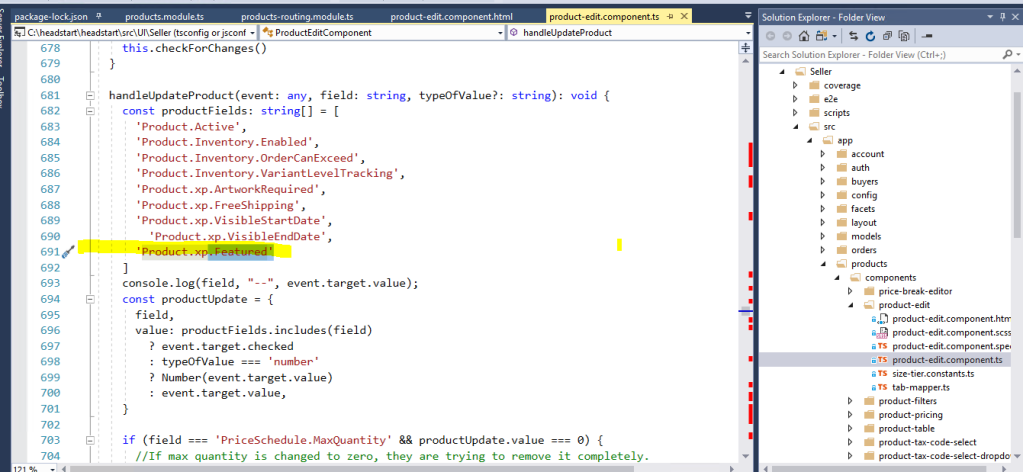
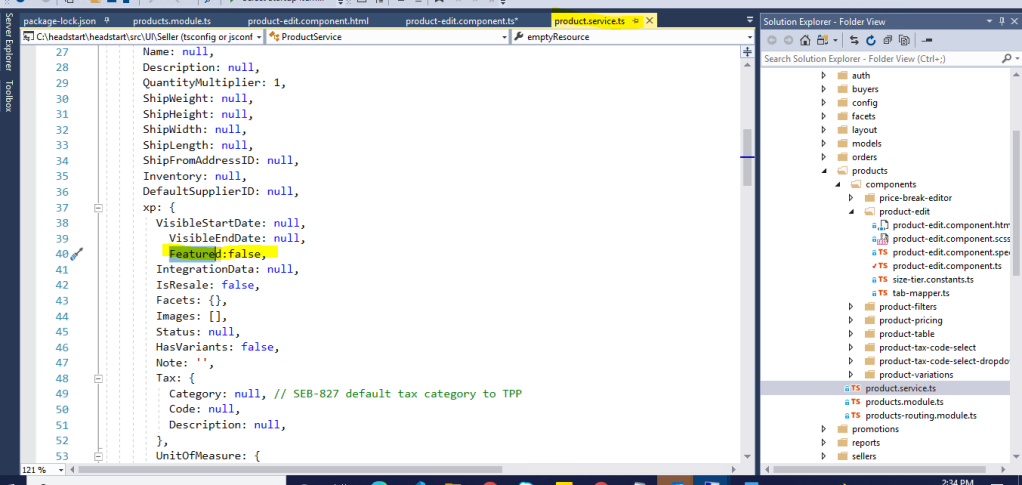
We have to update existing component code and please find the below detail below.
As we know Sitecore Acquire the Four51 Ordercloud Headless Commerce to fulfilled the B2B space of Sitecore experience commerce. OrderCloud is an API First Headless truly Cloud Native B2B eCommerce Platform. To get more detail please go through the OrderCloud documentation https://ordercloud.io/discover/platform-overview.
Sitecore Ordercloud provide the JavaScript /.Net SDK to built the custom storefront as per our requirement. Sitecore Ordercloud also providing the Headstart ecommerce solution (storefront and Admin websites) which is built in Angular & .NET Core and backend as OrderCloud API .
Architecture and Component detail you can find here.
In this article we will cover , How we will setup the Ordercloud Headstart Demo.
Step 2. Create the new Market place on Ordercloud to enable your ecommerce solution
Step 3 Now download/checkout the Headstart ecommerce solution code from here
Headstart ecommerce Solution is have three application as given below.
Middleware – The backend written in ASP.NET Core. Extends and enhances the capabilities of OrderCloud by integrating with best-of-breed services.
Buyer – The frontend buyer application written in Angular. This includes the entire shopping experience from the perspective of a buyer user.
Seller – The frontend admin application written in Angular. This includes everything needed to manage the data in your buyer application(s).
Headstart Repo has given the enough information to setup the solution you can find the details here . I want to share our knowledge to setup the solution which may be help you.
We have deployed the Buyer/Seller and Middleware on Azure VDI not on Azure Azure PaaS but It is up to you where you want to host the solution. Lets start the setup the code.
Middleware / Buyer and Seller Application setup
Post Code checkout first we have to setup the middleware .NetCore application.
Step 1. Build the Solution and publish to IIS configured application and configure the application hostname and it will start working. Now we have to configure some parameter in Json configuration file . We have to fill all the required parameter as per definition given here .
You will find the “AppSettingConfigTemplate.json” sample template under root directory. change the file name to “appSettings.json” in application root folder.
. Please find the prefilled configuration file screen shot.
Please create account storage and enable cosmos DB app service on AZURE. Fill the parameter accordingly.
Step 2 To connect the Middleware application with Ordercloud, we have to configure the Middleware client Id and ClientSecret parameter value. To get these value we have to call the Middleware Seed API using postman. T
Here are the detail given to configure the seed API request parameter . In postman you have to call your Seed Api with this url : {http:// Hostname/seed}
In body section set the following parameters. .
{  "PortalUsername": "User name use for Ordercloud portal"

  "PortalPassword": "password use for Ordercloud portal ",

  "InitialAdminUsername": "admin",

  "InitialAdminPassword": "Admin@2021",

  "MiddlewareBaseUrl": "Replace with Middleware host name",

  "SellerOrgID" : "Use Marketplace Unique Identifier value",

  "SellerOrgName" : "Market place name",

  "OrderCloudSettings": {

    "Environment": "sandbox",

    "WebhookHashKey": "Password@123"

  },  "BlobSettings" : {

    "ConnectionString" : " use Azure account storage key",

    "ContainerNameTranslations" : "ngx-translate"  }},
Now login to the portal and click on market place, after executing this Seed API following are are the section are updated/added with the items in OrderCloud commerce portal
Security profile
Clients API Keys
Default catalog
Default buyer
Buyer Address
Now copy the Middleware client id and secret key from Ordercloud portal and added to Middleware appconfig file.
Now your Middleware application is up and running and default Buyer/catalog has been created. Now we have to setup the Seller admin first and then Buyer.
To Setup the Seller and Buyer Angular app please follow the Headstart guideline. I will only share what parameter we need to configure to connect the Middleware and Ordercloud.
Seller App
Step 1 Open Seller app code root directory and navigate to this file “\src\UI\Seller\src\assets\appConfigs\defaultadmin-test.ts” and fill these parameters which marked as bold.
 "hostedApp": false,

 "sellerID": "Market place unique identifier",

 "sellerName": "Default Admin",

 "appname": "Default Admin",

 "clientID": " check API client section on Ordercloud and select the keys of Default HeadStart Admin UI",

 "middlewareUrl": "Your Middleware url",

  "cmsUrl": "https://ordercloud-cms-test.azurewebsites.net",

 "translateBlobUrl": "https://localheadstartstorage.blob.core.windows.net/ngx-translate/i18n/",

 "blobStorageUrl": "https://localheadstartstorage.blob.core.windows.net",

 "orderCloudApiUrl": "https://sandboxapi.ordercloud.io"}{
Step 2 Open Seller app code root directory and navigate to this file “src\UI\Seller\src\environments\environment.local.ts.” and fill this parameter which marked as bold
Add your middleware application url to parameter “localMiddlewareURL“
Buyer App
Step 1 Open Buyer app code root directory and navigate to this file “\src\UI\Buyer\src\assets\appConfigs\defaultadmin-test.ts” and fill these parameters which marked as bold.
  "hostedApp": false,
  "appname": "Replace with App name",
  "appID": "Add app id",
  "clientID": "check API client section on Ordercloud and select the keys of Default Buyer Storefront",
  "incrementorPrefix": "HS_TEST",
  "baseUrl": "",
  "middlewareUrl": "Replace with Middleware url",
  "cmsUrl": "https://ordercloud-cms-test.azurewebsites.net",
  "creditCardIframeUrl": "https://fts-uat.cardconnect.com/itoke/ajax-tokenizer.html",
  "translateBlobUrl": "https://localheadstartstorage.blob.core.windows.net/ngx-translate/i18n/",
  "sellerID": "Seller unique Identifier",
  "sellerName": "Replace with Market place anme",
  "orderCloudApiUrl": "https://sandboxapi.ordercloud.io",
  "theme": { "logoSrc": "Set logo imgae of storefront portal" },
  "instrumentationKey": null
}{
Step 2 Open Seller app code root directory and navigate to this file “src\UI\Buyer\src\environments\environment.local.ts.” and fill these parameter which marked as bold
Add your middleware application url to parameter “localMiddlewareURL“
Finally follow all the above steps Headstart apps will up and running but to run storefront we needs to setup products and other features like Avalara – for tax calculation. I will try to cover these topics in next post. Please share your feedback if I have missing something
Acknowledgment
I want to thanks my Team Vidhi and Bhaskar who help me setup and explore the Order cloud ecommerce. Also want to thanks to Himadri to publish the descriptive article on Ordercloud and it was very helpful for me, when I have started the Ordercloud setup.